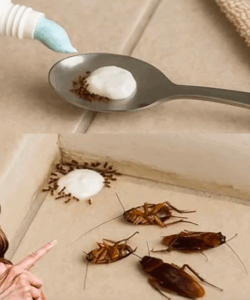
A natural, effective remedy combines mint toothpaste, baking soda, and white vinegar. This simple mix works as a powerful insect repellent, thanks to the sharp peppermint scent and the fizzing chemical reaction between vinegar and baking soda. Insects can’t stand it—and they leave quickly.
To make it, mix 1 tablespoon of mint toothpaste with 1 tablespoon of baking soda. Slowly add 1 tablespoon of white vinegar, letting the mixture bubble. Stir in 120 ml of lukewarm water and a few drops of peppermint essential oil if you have it. That’s it—your bug-fighting potion is ready.
Pour the mixture into small containers, like jar lids, and place them around the home—near trash cans, under sinks, or by windows. For best results, refresh every 2–3 days and use a cotton swab to apply it in corners or along baseboards. This safe, non-toxic blend is a simple, affordable way to keep your home pest-free and fresh-smelling.
]]>
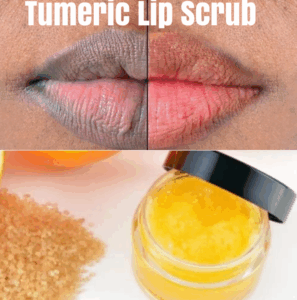
What Causes Lips to Darken Over Time
To understand how turmeric may help, it’s important to first look at what causes lips to darken. In most cases, the issue is not medical but lifestyle-related. Common triggers include
- Sun exposure without lip protection
- Smoking or tobacco use
- Frequent caffeine or tea consumption
- Dehydration or not drinking enough water
- Reactions to certain lipsticks or lip care products
- Lack of exfoliation, leading to dead skin buildup
- Vitamin B12 deficiency in some cases
By identifying and addressing the cause, you can often improve your lip tone naturally. Turmeric may offer an additional boost when paired with healthy habits.
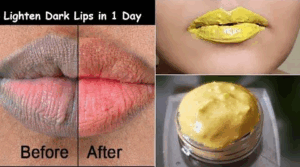
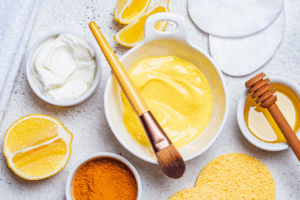
Why Turmeric Is Being Used for Lip Care
Turmeric contains a powerful compound called curcumin. This antioxidant and anti-inflammatory agent is the source of turmeric’s bright yellow color and many of its wellness benefits. While curcumin has been studied for its potential role in joint support and immunity, it also appears to offer some benefits when applied to the skin.
Here’s why turmeric may help with dark lips
- Its antioxidant properties support skin cell renewal
- It may help reduce mild pigmentation and discoloration
- When mixed with moisturizers, it can soften and soothe dry lips
- Its natural color may temporarily tint lips, giving them a glow
- Some traditional beauty routines have long used turmeric for brightening skin tone
Keep in mind that results vary by skin type, and turmeric should always be used in moderation to avoid staining or irritation.
How to Use Turmeric Safely on the Lips
If you’re curious about trying turmeric for lip care, there are a few safe and easy ways to apply it at home using ingredients you may already have in your kitchen. These blends should be used only a few times a week, and always tested first on a small area.
Turmeric and Honey Lip Mask
Ingredients
- 1/4 teaspoon turmeric powder
- 1 teaspoon raw honey
Instructions
- Mix into a smooth paste
- Apply a thin layer to clean lips
- Leave on for 5 to 10 minutes
- Wipe gently with a damp cloth
Turmeric and Yogurt Paste
Ingredients
- 1/4 teaspoon turmeric
- 1 teaspoon plain yogurt
Instructions
- Apply to lips for 5 to 7 minutes
- Rinse with lukewarm water
- Pat dry and apply a lip balm

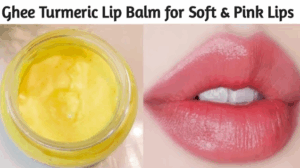
DIY Turmeric Lip Balm
Ingredients
- 1 tablespoon coconut oil
- 1/4 teaspoon turmeric
- Optional 2 drops of vitamin E oil
Instructions
- Warm the coconut oil and mix in turmeric
- Cool and store in a clean container
- Apply lightly at night before sleep
Always avoid rubbing hard or leaving turmeric on overnight, as it may stain the skin or pillowcase. A light application and a consistent routine work better than overuse.
Tips to Help Brighten and Protect Lips Naturally
Using turmeric can be part of a wider routine to care for your lips and keep them looking naturally healthy. Here are some additional habits that may help improve lip tone and prevent further darkening
- Drink enough water every day to stay hydrated
- Use a lip balm with SPF to protect against sun damage
- Avoid licking your lips, which can make dryness worse
- Exfoliate gently once a week with sugar and honey
- Limit smoking and reduce caffeine if possible
- Eat foods rich in vitamin B12 and iron
A holistic approach that includes diet, hydration, and protection will help you get the best results from any natural remedy, including turmeric.
What Results to Expect and When to Seek Help
Turmeric is not a miracle solution, but it may offer gradual improvements when used consistently. You may notice your lips feel softer, look more even-toned, and have a subtle glow. However, results can take several weeks and depend on the root cause of the discoloration.
If your lips remain dark or develop unusual changes such as cracking, sores, or persistent discoloration, it’s a good idea to check with a healthcare professional. Sometimes lip issues are a sign of an underlying health concern that requires attention.
Final Thoughts
Turmeric offers a gentle and natural way to support lip health and brighten tone over time. When combined with healthy habits like hydration, sun protection, and proper exfoliation, it may help restore your lips to a more natural, even appearance. While it’s not a guaranteed fix, many people find it a helpful and cost-effective part of their skincare routine.
Try one of the simple recipes above and see how your lips respond over the next few weeks. And remember, healthy habits work best when they’re part of a consistent, mindful lifestyle.
If you found this article helpful, share it with a friend or explore more natural beauty tips on our website
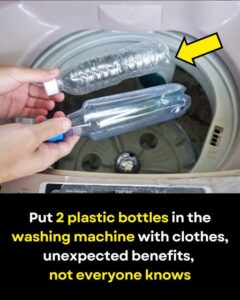
]]>- Use for Regular and Heavier Loads: This method works particularly well for regular and heavier loads, such as towels, bed linens, and denim. These types of items often become tangled or knotted, so the bottles are beneficial in helping them remain separate.
- Avoid for Delicate Fabrics: Plastic bottles may be too abrasive for delicate items like lace, silk, or thin knits, which could get caught on the bottles’ edges. Stick to more durable items for this trick.
- Repeat Regularly for Consistent Results: Making this a regular part of your laundry routine can help keep clothes in better condition over time, reducing wear from friction and ensuring thorough cleaning.
Benefits Beyond Wrinkle Reduction
Using plastic bottles in your washing machine goes beyond simply reducing wrinkles. Here’s a deeper look at the additional benefits this trick can offer:
- Reduced Lint Formation: Because the bottles keep clothes moving freely, they reduce friction between fabric fibers, which in turn can help reduce lint formation. Fewer fibers break down during the wash, helping to keep clothes looking newer for longer.
- Less Tangling: When clothes are allowed to tangle, especially long items like pants or sheets, they often come out of the wash knotted up. The bottles help keep items moving independently, minimizing the chances of tangling.
- Faster Drying: When clothes come out of the wash less wrinkled and untangled, they dry more efficiently. Without tightly twisted fabrics, airflow in the dryer improves, meaning clothes dry faster, saving you time and energy.
- Increased Longevity of Fabrics: Excessive wrinkling, tangling, and lint formation can all contribute to faster wear and tear on fabrics. By minimizing these effects, this simple hack can help extend the lifespan of your clothes, reducing the need to replace them as frequently.
A Sustainable, Cost-Free Solution
The plastic bottle hack is an eco-friendly alternative to store-bought fabric softeners or anti-wrinkle sprays. Since it reuses items you already have at home, it’s a cost-effective and sustainable option for laundry care. Additionally, by reducing your reliance on commercial laundry products, you’re limiting exposure to chemicals and reducing plastic waste from disposable fabric softener bottles.
Safety Considerations
While this trick is generally safe, here are some safety reminders:
- Check Bottle Condition: Ensure that the bottles are intact and free of any sharp edges, cracks, or rough patches. Damaged bottles can tear fabric.
- Keep Caps Tight: A loose cap can come off during the wash, letting water enter the bottle and altering its effectiveness. Ensure caps are securely in place.
- Monitor Machine Balance: If you have a front-load washer, make sure the bottles don’t interfere with the door seal or disrupt machine balance, which can happen with heavier bottles.
Conclusion: A Simple Trick for a Better Laundry Routine
Adding two plastic bottles to your washing machine may seem unconventional, but it’s a practical and effective way to improve the washing process. From reducing wrinkles to minimizing tangling, this simple trick offers a range of benefits for little to no cost. By incorporating this hack into your weekly laundry routine, you can enjoy cleaner, fresher, and more manageable laundry every time. Give it a try, and see how much easier laundry day can become!
We’ll talk about the reasons why bathrooms smell in this blog post, how to avoid it, and what products you may use to clean up or solve the issue. This article should assist you in resolving your bathroom smell problem.
What is the source of the pee smell in my bathroom?
Actually, there are several causes for the urinal stench in your bathroom.
Your toilet’s loose seal, poor hygiene practices, or bacterial buildup could all be to blame for the urine odor in your bathroom.
Let’s examine each of these reasons in more detail:
The toilet’s seal is leaking.
If your bathroom has a urine-like odor, there may be a leak in your toilet’s seal. A faulty seal may allow water to seep out, creating a moist atmosphere that can draw bacteria. Mineral deposits, a frequent issue in locations with hard water, were probably to blame for the breach in the seal itself. Another factor could be poor installation work done by the installer (not you, is it?).
Lack of Hygiene
Lack of frequent bathroom cleaning might result in unsanitary conditions and a urine odor. When dirt, dust, and other debris build-up, bacteria can flourish in an ideal environment. Additionally, bacteria are known to adore eating organic material like urine.
I was giving you the benefit of the doubt at this point and blaming the entry of dirt and other small particles into your home as the smell’s origin. But let’s face it, your energetic toddler who simply can’t seem to get in the pool is frequently the culprit. Be kind to him; things happen. Naturally, this accident will accumulate over time on the rear of the toilet seat or even at the floor’s base. Heck, I’ve even witnessed a few misfires from children hit a wall.
Waterborne Bacteria
Your bathroom is the ideal environment for bacteria because they love to live in moist, dark places. There are many areas in the bathroom where water can collect, including the shower, the area surrounding the toilet, and even under the sink. All of them are excellent environments for bacterial growth. These bacteria produce a gas with a urine-like odor when they grow in number.
How to identify the issue and solve it
Now that we are aware of the potential causes of the offensive pee odor in your bathroom, let’s discuss how to identify the problem and resolve it.
Starting with the leaking seal. The best approach to determine if this is the problem is to pour a few drops of food coloring or dye into the toilet tank. If the color of the water in the bowl changes, you have a leaky seal and should have it corrected. You should also be able to determine whether you have a leak from beneath the toilet base if you put the dye in the bowl first.
Your toilet’s wax ring has to be changed if the seal is leaking. You can either do this straightforward process on your own or have a professional handle it for you.
Once the wax ring has been replaced, make sure the bathroom stench has disappeared. If not, it’s time to investigate whether a bacterial overgrowth or inadequate hygiene are to blame.
Regarding inadequate hygiene, this is a simple one. Simply check the area around the toilet, especially under the seat, for any pee stains that were not there by any other means. The obvious solution is to clean it with a scrub brush and bathroom cleaner. The boys in the house need to be talked to after that.
I would have a specialist examine the bacteria in your water in regards to it. Who knows what’s happening deeper in your pipes? It can be a symptom of something more serious. And in that case, doing it yourself is not something I would advise.
Prevention advice to maintain the scent of your bathroom fresh
Let’s talk about strategies to avoid the issue altogether now that we have a better understanding of how to diagnose it.
The best strategy to avoid a urine-like restroom odor is to practice good hygiene practices. This entails using a disinfectant cleaner to frequently clean your bathroom. Additionally, remember to regularly scrub the toilet, paying specific attention to the area around and under the seat. I truly mean to do it every week or two when I say “once in a while.” Great if you can finish it sooner!
Ventilating the room is another effective method of preventing a restroom odor. During and after showers, you can achieve this by opening a window or turning on an exhaust fan. This will aid in removing any moisture that can encourage the growth of bacteria.
In order to cover up any offensive odors, you can also place an air freshener in your bathroom. If you frequently have company around or just want your bathroom to smell clean and fresh, this is a perfect alternative.
Products and techniques for removing urine odor
Let’s speak about various goods and techniques for getting rid of urine odor now that we know how to avoid a bathroom stench.
The easiest technique to get rid of a pee odor in your bathroom is to use an enzyme cleaner. Enzyme cleaners operate by dissolving the organic material (such as bacteria) that is the source of the odor. Most shops that offer cleaning goods carry these cleansers.
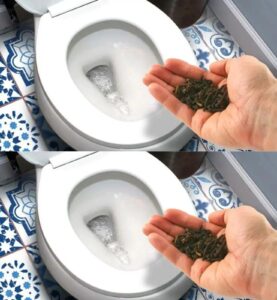
In addition to enzyme cleaners, white vinegar can also be used to get rid of urine odor. Simply combine water and vinegar in equal parts in a spray bottle, then mist it over any urine-smelling places. After that, wait a short while before wiping it away.
Baking soda is another widely used technique for removing urine odor. To do this, cover the entire bathroom floor with a thick layer of baking soda. Let it stand the following morning, and then sweep or vacuum it up.
Use a professional product like Mr. Clean’s Magic Eraser to remove pee stains that are particularly difficult to remove. To remove the spots, simply wet the eraser and scrape it.
Finally, you can get your pipes professionally cleaned if you’re searching for a long-term fix to your bathroom odor issue. To avoid any build-up, this is something that needs to be done every few years. Even while this doesn’t address the issue of hygiene, you may rest easy knowing that your waterworks are maintained on the inside.
As a result,
There you have it, then! a thorough explanation of the causes and solutions to the pee smell in your bathroom. I hope this was helpful and that you are now headed to a restroom that smells better. Please get in touch with a plumbing expert if you have any queries or suggestions. Gratitude for reading!
]]>Psychotherapist and mystic Ellen Goldberg, also known as the Wise-Woman Therapist, shares her expertise on how palmistry can provide insights into love and marriage by analyzing two significant lines on the hand.

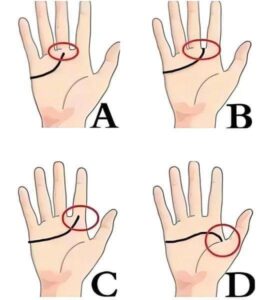
The first line, located on the Mount of Venus beneath the thumb, offers clues about when love and marriage might occur in one’s life. “The line of influence near the Mount of Venus is particularly accurate in predicting when one might experience love and affection,” Goldberg explains. The second important line, referred to as the heart line or “lines of affection,” can be found on the Mount of Mercury under the pinkie finger.
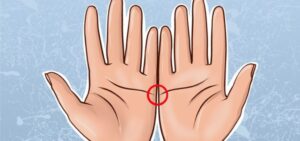
According to Goldberg, a long, uninterrupted line indicates “a deep, true love that lasts a lifetime.” The proximity of the love line to the lifeline signifies the level of intimacy in the relationship.
Moreover, palmistry can reveal a person’s approach to love. A full and firm Mount of Venus suggests a strong desire for pleasure and a vibrant sexual nature, whereas flat hands may point to challenges in expressing love.
Lastly, Goldberg recommends examining both hands. She notes that the dominant hand reflects the direction one’s life is taking, while the recessive hand uncovers inherent character traits and destiny.
]]>What is the MBTI?
The MBTI is based on Carl Jung’s theory of psychological types. It categorizes people into 16 different personality types based on four dichotomies:
Extraversion (E) vs. Introversion (I): This dichotomy describes how individuals gain energy. Extraverts are energized by interacting with others, while introverts recharge by spending time alone.
Sensing (S) vs. Intuition (N): This dimension focuses on how people perceive information. Sensors rely on concrete, factual information, whereas intuitives look at patterns and possibilities.
Thinking (T) vs. Feeling (F): This pair explains how people make decisions. Thinkers base decisions on logic and objective criteria, while feelers consider personal values and how decisions will affect others.
Judging (J) vs. Perceiving (P): This dichotomy highlights one’s approach to structure and planning. Judgers prefer a planned and organized lifestyle, while perceivers are more flexible and spontaneous.
By answering a series of questions, the MBTI identifies which side of each dichotomy a person prefers, resulting in a four-letter personality type (e.g., INFP, ESTJ).
The 16 Personality Types

Each of the 16 MBTI personality types offers a unique blend of characteristics. Here is a brief overview:
ISTJ (The Inspector): Practical, fact-minded individuals who value tradition and order.
ISFJ (The Protector): Warm, dedicated people who are always ready to defend their loved ones.
INFJ (The Advocate): Idealistic and principled individuals with a strong sense of integrity.
INTJ (The Architect): Strategic thinkers with a plan for everything.
ISTP (The Virtuoso): Bold and practical experimenters, masters of all kinds of tools.
ISFP (The Adventurer): Flexible and charming artists, always ready to explore and experience something new.
INFP (The Mediator): Poetic, kind, and altruistic people, always eager to help a good cause.
INTP (The Logician): Innovative inventors with an unquenchable thirst for knowledge.
ESTP (The Entrepreneur): Smart, energetic, and perceptive people who truly enjoy living on the edge.
ESFP (The Entertainer): Spontaneous, energetic, and enthusiastic performers—life is never boring around them.
ENFP (The Campaigner): Enthusiastic, creative, and sociable free spirits who can always find a reason to smile.
ENTP (The Debater): Smart and curious thinkers who cannot resist an intellectual challenge.
ESTJ (The Executive): Excellent administrators, unsurpassed at managing things or people.
ESFJ (The Consul): Extraordinarily caring, social, and popular people, always eager to help.
ENFJ (The Protagonist): Charismatic and inspiring leaders, able to mesmerize their listeners.
ENTJ (The Commander): Bold, imaginative, and strong-willed leaders, always finding a way—or making one.
Why Take the MBTI?
Understanding your MBTI personality type can provide numerous benefits:
Self-Awareness: Gain insight into your strengths, weaknesses, and preferences.
Improved Relationships: Better understand and relate to others by recognizing different personality types.
Career Guidance: Identify careers that align with your natural tendencies and strengths.
Personal Growth: Use your personality insights to develop skills and overcome challenges.
How to Take the MBTI
The MBTI is widely available online, with various platforms offering free or paid versions of the test. While the official MBTI assessment provides the most accurate results, many free versions can still offer valuable insights.
To take the MBTI, you’ll answer a series of questions about your preferences and behaviors. The test typically takes around 15-30 minutes to complete. Once finished, you’ll receive your four-letter personality type and a detailed description of your type’s characteristics.
Conclusion
The MBTI personality test is a powerful tool for discovering more about yourself and others. By understanding your MBTI type, you can unlock a deeper level of self-awareness, improve your relationships, and make more informed decisions about your career and personal life. Whether you’re seeking personal growth, professional development, or simply curious about your personality, the MBTI offers valuable insights that can guide you on your journey.
]]>And while we can explain it, fair warning: once you know the full story, “WC” might seem just as odd as “restroom,” “bathroom,” or “loo.”
The Great Bathroom Name Debate
In 2020, a TikTok video featuring a couple, Shelby and Dylan, went viral, perfectly capturing the confusion around bathroom terminology.
Passing a “Washroom” sign, Dylan joked:
“What even is a washroom? And what are they washing in there? Oh, it’s a restroom. The only thing I wash is my hands!”
Off-camera, Shelby chimed in:
“Do you rest in a restroom?”
Dylan laughed in agreement.
Naturally, the internet had a blast. Commenters jumped into the debate, championing their favorite words: “bathroom,” “restroom,” “washroom,” and even simply “toilet.”
One user shared a hilarious memory of asking for the “washroom” at Disneyland — and being directed to a laundromat! Another added: “Just wait until he hears about the water closet.”

So, What Exactly Is a Water Closet?
According to Merriam-Webster, a “water closet” is a small room or compartment containing a toilet.
Back in the day, “bathrooms” were spaces solely for bathing. “Restrooms” were designed for freshening up. But when it came to actually using a toilet, people needed a separate, much smaller room: the water closet.
Today, the abbreviation “WC” still pops up in places like airports, hotels, and restaurants — especially those catering to international travelers. It’s simply another, slightly old-fashioned way of saying “bathroom.”
A Brief History Lesson
Before the late 19th century, indoor plumbing was rare and mostly reserved for the wealthy. The majority of Americans relied on outhouses or outdoor facilities. Even if a house had a “bathroom,” it was typically just for bathing — no toilet included.
The “water closet” arrived in the 1890s: a small, separate room inside the home, housing an indoor toilet. By the early 20th century, the modern all-in-one bathroom (toilet, sink, and bathtub combined) became the norm — but the term “WC” stuck around in many regions.
What People Are Saying Today
On Reddit, debates about bathroom naming conventions are still going strong. In a post titled, “Why is a public WC called a bathroom if there’s no bath?” users from around the world shared their insights:
“Americans could just as easily ask: why call it a WC if it’s not even a closet?”
“In Russian, it’s called ‘a room without windows’ — even if it has windows!”
“In Esperanto, it’s ‘necesejo,’ which literally means ‘necessary place.’”
Others pointed out that “washroom” is especially popular in Canada and parts of the U.S. Midwest.
One comment perhaps summed it up best:
“‘Washroom’ makes the most sense — you should be washing in there, not resting!”

What About You?
What do you call it — bathroom, washroom, restroom, WC, or something else entirely? Share your thoughts — and don’t forget to pass this story along to friends and family to find out what they call it too!
]]>Why Receipts Matter More Than You Think
1. They’re Proof of Purchase
A receipt is your official record showing what you bought, when, and for how much. This is especially important in situations such as:
Returns and Exchanges: If an item turns out to be faulty or not the right size, stores will almost always require a receipt before offering a refund or exchange.
Price Disputes: If a product rang up at the wrong price, your receipt gives you the evidence needed to correct the mistake.
2. They Help Catch Billing Errors
It’s more common than you think: promotions not applied, items scanned twice, or loyalty points not credited. Without reviewing your receipt, you might never realize you were overcharged.
Missed Discounts: Promotional pricing doesn’t always apply automatically.
Duplicate Charges: Sometimes, the same item gets scanned twice.
Loyalty Points Errors: Special deals or rewards may not process correctly.
Tip: Check your receipt before leaving the store so any mistakes can be fixed immediately.

3. Receipts Help You Track Your Spending
If you’re aiming to manage your budget better, receipts are a helpful resource.
Spending Categories: Break down your purchases—groceries, toiletries, entertainment—to see where your money is going.
Purchase Patterns: Comparing receipts over time reveals habits and helps reduce impulse buying.
Better Planning: Spotting frequently purchased items makes it easier to plan and shop efficiently.
4. Important for Taxes and Work Reimbursements
If you’re self-employed or make business-related purchases, receipts may be necessary for tax deductions or getting reimbursed by your employer.
Work Expenses: Office supplies, meals, or travel—without a receipt, you may not get reimbursed.
Tax Claims: Receipts serve as essential documentation for certain deductible expenses.
5. Safety During Product Recalls
If a product you purchased gets recalled due to a defect or contamination, your receipt can help you verify whether you bought that specific item.
Food Safety: Your receipt lets you check the purchase date or batch if a product recall is announced.
Returns and Refunds: Some stores require a receipt to process returns for recalled or dangerous items.

6. Unlock Loyalty Benefits
Receipts often show your loyalty points, discounts, or contain promotional coupons for future purchases.
Double Check: Make sure loyalty points were credited.
Hidden Deals: Some receipts include coupons or offers that could save you money later.
7. Prevent Disputes and Fraud
Receipts offer a layer of protection in case of a mistake or if you’re questioned about a purchase.
Proof of Payment: A receipt confirms that you’ve paid for your items.
Backing Your Claim: If a store refuses a refund or questions your purchase, your receipt is your strongest evidence.
A Simple Habit with Big Benefits
Grabbing and keeping your receipt might seem minor, but it can protect your rights, help manage your money, and even save you from future headaches. So next time you shop, take that little slip of paper—it might come in handy when you least expect it.
]]>After a long time, belongings will accumulate a lot of dirt, making them unhygienic when used. Stains also reduce the usefulness of the belongings. Don’t worry! Please refer to the article below.
Use vinegar to clean the shower
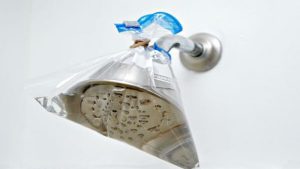
After a long time of use, the showerhead will easily accumulate scale, causing blockage and affecting the water quality.
A quick way to clean the showerhead is to use vinegar. Prepare a plastic bag filled with vinegar and soak the dirty showerhead for about 1 hour. After soaking in vinegar, the stains will become easy to scrub, you just need to use a brush to scrub lightly and the stubborn stains will disappear.
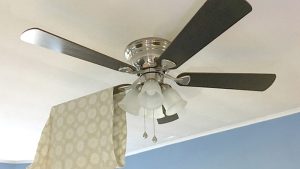
Clean the ceiling fan with a pillowcase
Ceiling fans that have been used for a long time will get dusty and very dirty when used, especially the fan blades. To clean the fan blades in the simplest way is to use a pillowcase, take an old pillowcase and wrap it around the fan blades and wipe in a certain direction. This way, the dust on the fan blades will be cleaned and not scattered everywhere.
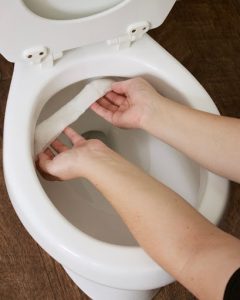
Use paper towels and white vinegar to clean the rim of the toilet
The toilet is a place that contains a lot of bacteria, so cleaning it thoroughly and removing yellow stains on the toilet is very necessary. Perhaps the most difficult place to clean is the rim of the toilet, when used for a long time, stains will stick and be very difficult to scrub.
The effective way to clean the toilet rim is to use a paper towel soaked in vinegar and then stuff the towel into the edge of the toilet. Then leave the paper towel like that for a few hours, then take it out and scrub it again.
Use steam to clean your microwave
After a long time of use, the microwave will have stubborn stains. The simple way to handle it is as follows: mix water and vinegar in a 1:1 ratio and then put it in the oven for 5 to 10 minutes. Finally, just wipe it clean.
Remove sweat stains from white shirts
Ugly yellow sweat stains appear on white shirts, making them lose their aesthetic appeal. Here is a simple way to do it: mix a solution of detergent and hydrogen peroxide in a 1:2 ratio. Then rub this solution on the yellow stains and sprinkle a little baking soda on top. Finally, use a brush to scrub the stains and let the solution soak into the shirt for about 1 hour, then wash as usual to solve the ugly yellow stains on the shirt.

Whiten your clothes without using bleach
Clothes will gradually become stained over time, but using bleach many times will reduce the quality of the fabric. So, there is a simple way to deal with these stubborn stains. Use a mixture of water in the following proportions: 12 cups of water, 1/4 cup of lemon juice and 1 cup of hydrogen peroxide. Every time you wash clothes, pour 2 cups of the above mixture into the wash. Over time, the stains will disappear.
Clean old pillows
Pillows used for a long time will contain many bacteria. So, boil a large pot of water, mix in 1 cup of detergent, 1 cup of dishwashing liquid and 1/2 cup of borax. When this mixture dissolves, add 1 cup of bleach and soak the pillow in it for about 30 minutes, then wash as usual.
Remove water stains on the faucet with vinegar
Faucets used for a long time will have many water stains, which look very unsightly. To clean, soak a paper towel in vinegar and wrap it around the faucet, wait for 30 – 60 minutes. Finally, just use a brush to clean the faucet and it will look clean again.
The above article has presented some great tips for cleaning household items at a low cost. Please refer to it!
1. What causes cracked heels?
In most cases, cracked heels are not too severe and may only cause slight discomfort, especially when walking barefoot. However, sometimes the cracks can deepen into the skin tissue, causing significant pain.
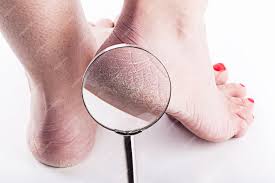
The common characteristic of cracked heels is dry, peeling, thickened, and cracked skin. The causes may include:
Medical causes:
- Diabetes: This condition leads to poor blood circulation and consistently high blood sugar levels, which cause dry skin. Moreover, diabetes can damage nerves, making it hard for patients to feel pain or notice cracked heels.
- Other health conditions: These include hypothyroidism, fungal infections, vitamin deficiencies, atopic dermatitis, psoriasis, dermatological conditions in adolescents, pregnancy, obesity, plantar keratosis (thickened skin), aging, skin fissures, cellulitis, and hyperkeratotic eczema.
Other causes:
- Standing for long periods of time;
- Taking hot showers or baths for too long;
- Walking barefoot frequently or wearing open-heeled shoes;
- Wearing tight shoes;
- Using strong antibacterial soaps or body washes that strip away the skin’s natural oils;
- Dry skin due to cold weather conditions
Cracked heels may be accompanied by symptoms such as itchiness, peeling skin, discharge, intense pain, inflammation, redness, and ulcerations. In particular, signs of infection like swelling, warmth, and redness at the heel area require prompt medical attention.
2. Why treat cracked heels with toothpaste?
Cracked heels are unsightly and uncomfortable, especially with weather changes. There are various home remedies, and one popular method is applying toothpaste to the cracked area to accelerate healing.
Toothpaste contains ingredients such as bleaching agents, baking soda, and fluoride, which help oxidize the cracks, remove dead skin cells, eliminate bacteria in the cracks, and speed up the healing process.

However, there is no scientific evidence supporting this method yet, although it is still used when necessary. The effectiveness of using toothpaste for cracked heels depends on each person’s skin type and the severity of the cracks. It is only a temporary fix and not a cure. For serious or infected cases, it’s best to seek medical advice.
3. How to treat cracked heels with toothpaste
Treating cracked heels with toothpaste is easy and can be done at home following these steps:
Step 1: Soak your feet in warm salt water for 10–15 minutes. This helps you relax, improves blood circulation, disinfects the cracked area, and softens the tough skin.
Step 2: After 15 minutes, dry your feet with a clean towel. Mix 1 tablespoon of white toothpaste with one vitamin E capsule and apply the mixture to the cracked heel.
Step 3: Leave it on overnight and rinse it off in the morning. You will notice a clear difference after just one use.
You should try this method 1–2 times a week to check for any negative reactions. If any irritation occurs, stop using it immediately to avoid infection or complications. If your skin responds well and results are promising, you may continue until the cracks heal.
As mentioned, toothpaste is only a temporary solution and does not address the root cause. It also depends on your habits and skin type, so avoid overusing it to prevent unwanted outcomes.
4. Other effective treatments for cracked heels
4.1. Exfoliate dead skin on your feet
The skin on the heels is often neglected during skincare routines, which makes it rougher and thicker. Soaking and exfoliating the feet is a useful method in this case. Keep the following tips in mind:
- Soak your feet in warm water for about 20 minutes;
- Use a pumice stone, foot file, or loofah to exfoliate;
- Let your feet air-dry and pat gently with a towel;
- Apply moisturizer to the cracked areas;
- Do not exfoliate dry skin as it may cause damage.
4.2. Use moisturizers
Moisturizers for cracked heels usually contain ingredients that exfoliate, hydrate, and soften the skin. Look for creams containing salicylic acid, urea, saccharide isomerate, and alpha-hydroxy acids.
When using these creams, apply 2–3 times a day to maintain moisture. Avoid walking barefoot and wear shoes to protect the heels. Always follow your doctor’s advice when choosing a cream; do not self-medicate as it might worsen the condition.
4.3. Use natural remedies
Some natural products are very effective for skincare, especially moisturizing the skin. You can try the following:
- Honey;
- Coconut oil;
- Olive oil;
- Oatmeal mixed with nourishing oil to exfoliate;
- Shea butter.
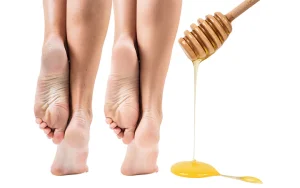
Among these, honey is known for its strong antibacterial properties, making it great for cleaning, healing wounds, and softening skin. Coconut oil is ideal for those with eczema, dry skin, or psoriasis.
5. Tips to prevent cracked heels
If you have experienced cracked heels before, choose soft, comfortable shoes and slippers to protect your feet, especially the heels. Avoid walking barefoot and instead wear sturdy shoes with wide heels to reduce pressure on your feet
Avoid wearing:
- Sandals or flip-flops, as they cause heel pain;
- Tight shoes, which can damage the feet and cause cracks;
- High heels or stilettos, which can deform your spine and foot arch, and cause heel pain and cracking.
Other prevention tips:
- Avoid sitting cross-legged or standing in one position for too long;
- Moisturize your feet regularly;
- Use heel cushions when wearing shoes to evenly distribute body weight and reduce pressure;
- Inspect your feet daily, especially if you have diabetes or skin conditions;
- Drink plenty of water to keep your skin hydrated and prevent dryness;
- Exfoliate dead skin, but never scrape off calluses or cracks if you have peripheral neuropathy or diabetes, as this could cause new wounds and lead to hard-to-treat infections.
In general, cracked heels are not a serious health concern for most people. To manage the condition effectively, it’s important to control any underlying health issues and consult a doctor if the cracks persist and significantly affect your daily life.
]]>